Connect with us

FOOD AND DRINK

What is Carne Frita? Recipe, Tips & Serving Ideas

Published

on

Carne Frita and bursting with flavor, carne frita is a beloved dish that holds a special place in Puerto Rican cuisine. Known for its irresistible golden-brown crust and tender, juicy interior, this dish is a go-to comfort food for many households. If you’ve heard of carne frita but never tried it—or if you’re ready to recreate this mouthwatering meal at home—you’re in the right place.
This blog will walk you through everything you need to know about carne frita, including a foolproof recipe, handy tips for perfect results, and plenty of inspiration on how to serve it.

What Is Carne Frita?

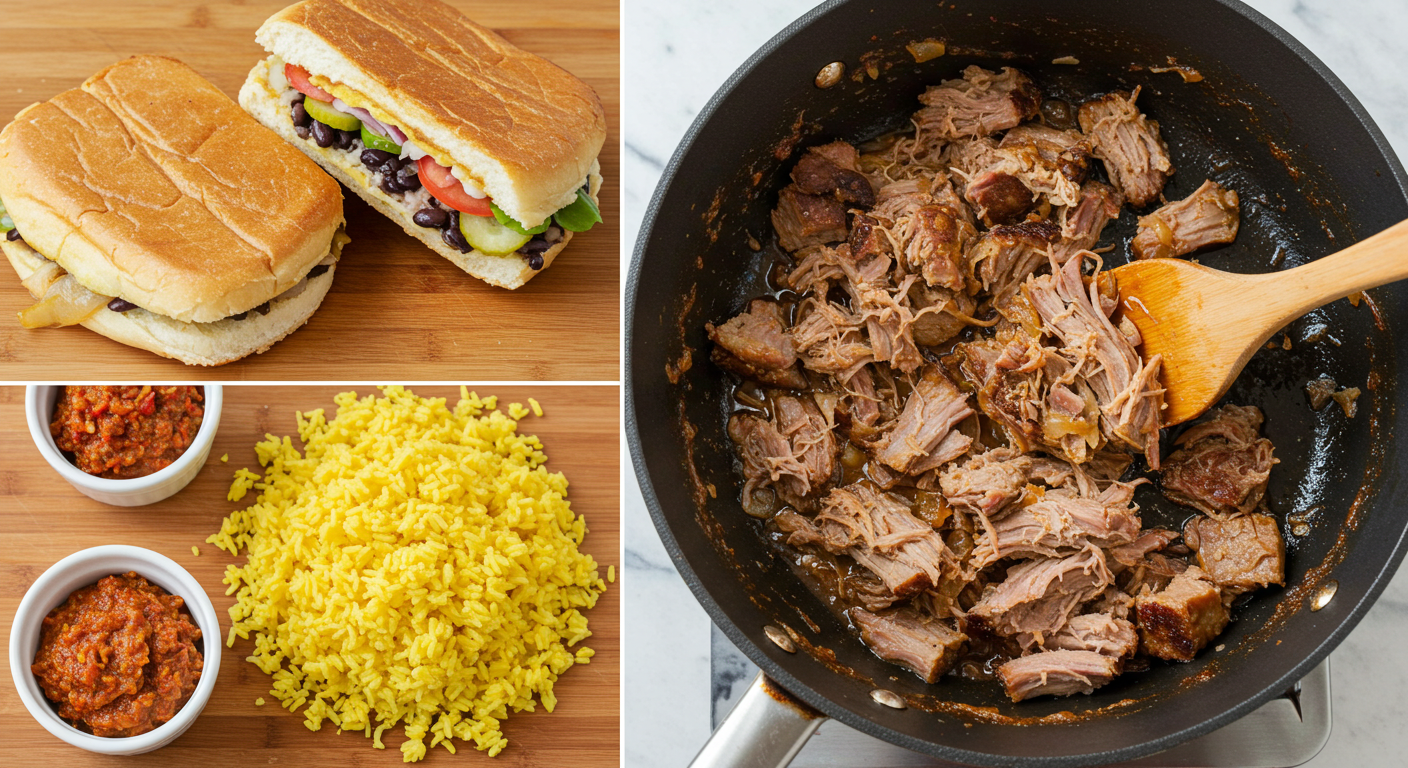
At its core, carne frita literally translates to “fried meat” in Spanish. While the name is simple, the flavors are anything but! This dish typically consists of chunks or strips of marinated pork shoulder, deep-fried until crispy on the outside and succulent on the inside. Carne frita is all about balancing bold seasonings, rich textures, and the perfect fry.
Carne frita is more than just a snack—it’s a cultural staple. Whether enjoyed as a main dish or a shared appetizer, this Puerto Rican favorite is loved for its versatility and satisfying flavor. It’s often paired with sides like tostones (fried plantains), arroz con gandules (rice with pigeon peas), or a fresh salad.

Ingredients for Carne Frita

To make authentic carne frita, you’ll need a few essential ingredients:
The Basics
Pork Shoulder (2-3 lbs): This cut is ideal for its rich flavor and tender texture when fried.

Oil for Frying: A neutral oil like vegetable or canola works best to achieve a golden crust.
Marinade Ingredients
Garlic (4 cloves, minced): The backbone of flavor in the marinade.

Adobo Seasoning (2 tbsp): A must for that authentic Puerto Rican taste.

Sazón (1 packet): This annatto-based seasoning adds color and depth.

Oregano (1 tsp): Adds a warm, herbal note.

Vinegar or Lime Juice (2 tbsp): For tenderizing the meat and adding brightness.

Salt and Pepper (to taste): To enhance the flavors.

Olive Oil (2 tbsp): Helps combine the seasonings and coat the pork.

How to Make Carne Frita

Best of all, making carne frita at home is simpler than you’d expect! Follow these six easy steps for fail-proof results.
Step 1: Prep the Pork
Trim excess fat from the pork shoulder, then cut it into bite-sized chunks or strips. Rinse the meat under cold water and pat it dry with paper towels.
Step 2: Marinate
Place the pork pieces in a large bowl. Add minced garlic, adobo seasoning, sazón, oregano, vinegar or lime juice, salt, pepper, and a drizzle of olive oil. Mix well to ensure every piece is coated in the marinade. Cover and refrigerate for at least 2 hours—overnight is even better for deeper flavor.

Step 3: Heat the Oil
Fill a deep skillet or heavy-bottomed pot with about 2-3 inches of oil. Heat it to 350°F (175°C). Use a thermometer if possible—the right oil temperature is crucial for achieving the perfect fry without greasiness.

Step 4: Fry the Pork
Carefully add the marinated pork to the hot oil in batches to avoid overcrowding the pan. Fry for about 5-7 minutes, or until the meat is golden brown and cooked through. Use tongs to remove the pork and drain on a plate lined with paper towels.

Step 5: Rest and Cool

Allow the fried pork to rest for a few minutes while any excess oil is absorbed.

Step 6: Serve and Enjoy

Carne frita is best enjoyed immediately while it’s crispy and hot. Pair it with your favorite sides or dipping sauces, and savor the bold, juicy flavors.

Tips for Perfect Carne Frita

Creating carne is straightforward, but these tips will take your dish to the next level:
Don’t Skip the Marinade: The longer the pork marinates, the better the flavor and tenderness.
Use a Thermometer: Maintaining the oil temperature at 350°F ensures your pork will fry evenly and not absorb too much oil.
Cut Even Pieces: Consistent sizing helps the meat cook evenly.
Double-Fry for Extra Crispiness: For an ultra-crispy texture, fry the pork once, then cool it slightly and fry again for 1-2 minutes.
Experiment with Seasoning: Mix in some paprika, cumin, or even a dash of chili powder for a custom twist.
Serving Ideas and Pairings
frita is incredibly versatile and pairs beautifully with a range of sides and condiments. Here are some popular options:
Classic Sides
Tostones: Fried green plantains are a classic accompaniment and offer the perfect crispy-creamy contrast to your carne .
Arroz Con Gandules: This seasoned rice dish with pigeon peas adds heartiness and a burst of flavor.
Salad: A fresh greens salad with a zesty vinaigrette balances out the rich, fried pork.
Dipping Sauces
Mayo-Ketchup: A simple yet iconic Puerto Rican sauce made of—you guessed it—mayonnaise and ketchup with a hint of garlic or lime juice.
Garlic Mojo Sauce: A bold and garlicky dipping sauce that enhances the flavors of carne frita.
Hot Sauce: Add a spicy kick with your favorite hot sauce for a bold flavor contrast.

Creative Serving Ideas

Why You’ll Love Carne Frita

Carne frita isn’t just a dish—it’s an experience. From the crunch of the perfectly fried exterior to the savory, juicy tenderness inside, every bite bursts with Puerto Rican flavor. Easy to make, endlessly versatile, and always crowd-pleasing, carne frita is a recipe worth mastering.
Try It Yourself!

There you have it—a complete guide to carne frita, including a simple recipe, handy tips, and plenty of serving inspiration to make it your own. Whether it’s for a family dinner, a weekend gathering, or a snack on the fly, carne frita is guaranteed to impress.
Feeling hungry already? Gather your ingredients, get frying, and enjoy the unbeatable taste of authentic Puerto Rican carne frita!

Conclusions

Carne frita is more than just a dish; it’s a celebration of Puerto Rican culture and culinary tradition. Its simplicity, flavor, and versatility make it a standout choice for any occasion. Whether you’re savoring it on its own or pairing it with your favorite sides, carne frita embodies the warmth and richness of comfort food. By trying this recipe, you’re not just making a meal—you’re connecting to a legacy of flavors loved by many. Enjoy the process, share it with loved ones, and relish every crispy, tender bite.

FAQs

1. What cut of meat is best for carne frita?

The best cuts of meat for carne  are pork shoulder or pork loin. These cuts are flavorful and tender, making them ideal for frying. Be sure to cut the meat into bite-sized pieces for even cooking.

2. Can I make carne frita ahead of time?

While carne frita is best enjoyed fresh and crispy, you can prepare the marinade a day in advance to save time. Cooked carne can also be reheated in the oven or air fryer to regain its crispiness.
3. What sides go well with carne frita?

Carne frita pairs wonderfully with traditional Puerto Rican sides like tostones (fried plantains), arroz con gandules (rice with pigeon peas), or a simple salad. You can also serve it with dipping sauces like garlic mayo for added flavor.
4. Can I use a different type of meat?

Yes, while pork is traditional, you can experiment with other proteins like chicken or beef. However, keep in mind that the flavor and texture may differ from the classic recipe.
5. What should I do if my meat isn’t crispy enough?

To ensure a good crisp, make sure the oil is hot enough before frying. The ideal temperature is around 350-375°F (175-190°C). Avoid overcrowding the pan, as this can lower the oil temperature and result in soggy meat.

Continue Reading
Click to comment

Leave a Reply

Your email address will not be published. Required fields are marked *

FOOD AND DRINK

Special K Bars | Nutrition, Benefits & Flavors

Published

on

By

Special K Bars | Nutrition, Benefits & Flavors

If you’ve wandered down the snack aisle recently, you’ve likely come across the iconic red “K” on the box of Special K Bars. Whether you’re looking for an on-the-go breakfast, a mid-day snack to boost your energy, or a post-workout treat, Special K Bars have become a popular option for health-conscious individuals.

But what exactly makes these bars stand out? Are they truly healthy, and what flavors can you choose from? This blog takes a deep look at Special K Bars, examining their nutrition, benefits, and the many delicious options offered.

What Are Special K Bars?

Special K Bars are pre-packaged snack bars made by Kellogg’s, designed to fit into a healthy and active lifestyle. Often found alongside other granola or protein bars, these light yet satisfying snacks are part of the Special K product line, known for promoting weight management and balanced nutrition.

Unlike heavier protein bars or indulgent granola bars, Special K Bars are marketed as a thoughtful balance between flavor and functionality—providing you with convenient energy without sacrificing taste.

Designed for Busy Lifestyles

Special K Bars are about convenience without compromise. For those juggling a tight schedule, they offer a quick bite that’s portion-controlled and aligned with healthier nutritional standards.

The Nutrition of Special K Bars

Are Special K Bars as healthy as they claim to be? Here’s a closer look at what’s inside these bars.

Calories and Macronutrient Breakdown

Each Special K Bar generally contains between 90 and 120 calories, depending on the flavor variety. This makes them a low-calorie option compared to other snack bars.

  • Protein: While some bars contain as little as 2g of protein, varieties like the ‘Protein Meal Bars’ pack around 10-12g of protein.
  • Fiber: Many Special K Bars contain 2-4g of fiber, supporting digestive health and helping you feel full longer.
  • Carbohydrates: With around 15-20g of carbs per bar, they provide quick, accessible energy for your day.
  • Sugar: Special K Bars typically have between 6-12g of sugar, depending on the flavor (with some options offering lower-sugar alternatives).

Key Ingredients

Special K Bars combine essential grains like rice, oats, and wheat, blended with flavors like fruits, chocolate, and nuts to create a variety of delicious options. Many include added vitamins and minerals, such as B vitamins or iron, meant to support energy metabolism or overall health.

However, be mindful—the addition of sweet syrups or artificial flavors can make some bars less ideal if you’re avoiding processed added sugars.

Benefits of Special K Bars

What sets Special K Bars apart from other snacks filling the shelves? Below are the standout benefits.

1. Portioned and Balanced for Weight Management

Portion control is essential when managing calories, and Special K Bars deliver just that—a satisfying snack that doesn’t go overboard on calories or sugar. Most bars are designed to help you enjoy something sweet or savory while still staying on track with your healthy eating goals.

2. Convenient and Portable

Whether you’re running to your next meeting or carpooling with kids, Special K Bars are compact and portable, making them easy to throw into any bag or lunchbox.

3. Supports Energy Levels

With a solid mix of carbs for quick energy, some protein, and occasionally added vitamins like B12 or iron, Special can help fuel your day and keep you going between meals.

4. Variety of Flavors to Suit All Tastes

From classic fruit-inspired flavors to indulgent chocolate-coated varieties, there’s something for everyone.

5. Affordable and Easily Available

Unlike some boutique snack bars, Special are reasonably priced and widely available in grocery stores, drugstores, and online retailers.

Explore the Delicious Flavors

Special K Bars come in a multitude of flavors, offering something to satisfy nearly any craving. Here are some of the most popular options broken into categories.

Fruity Flavors

  • Strawberry

Packed with dried fruit pieces for a vibrant burst of flavor.

  • Blueberry Bliss

A wholesome mix of blueberries and subtle sweetness.

Indulgent Flavors

  • Chocolatey Pretzel

Perfect for those who want the yum factor of chocolate with a crunchy twist.

  • Peanut Butter Chocolate

A smooth and nutty flavor for peanut butter lovers.

Protein-Packed Options

  • Caramel Peanut Protein Bar

Provides a slightly indulgent yet protein-rich fuel for your workouts.

  • Cookies and Crème Protein Bar

Offers a sweet dessert-inspired flavor with added protein.

Low-Sugar Alternatives

  • Cranberry Walnut

A nutty and tart option, with less sugar but plenty of taste.

  • Dark Chocolate Cherry

Provides a lower-sugar alternative without compromising on deliciousness.

How to Incorporate Special into Your Day

Still wondering how these bars can fit into your routine? Try these simple ideas.

  1. On-the-Go Breakfast

Pair a Special K Protein Bar with a cup of coffee or a piece of fruit for a quick breakfast that fuels your morning.

  1. Post-Workout Snack

Reach for a protein-rich flavor to help aid recovery after your workout.

  1. Office Stash

Keep a few bars in your desk drawer for late afternoon energy slumps.

  1. Travel Companion

Throw one in your purse or carry-on for a convenient snack on the road or when you’re flying.

Should You Try Special K Bars?

Ultimately, Special are a versatile snack option ideal for busy individuals looking to supplement their diet with something convenient and relatively healthy. While they may not replace a well-balanced meal, they provide a good alternative to fast food or heavily processed snacks.

For those chasing a fitness goal, craving something sweet without the guilt, or simply looking for a reliable snack for the day to day, Special  offer a dependable solution.

Continue Reading

FOOD AND DRINK

Liquid Marijuana Drink Recipe | Ingredients & How to Make It

Published

on

By

Liquid Marijuana Drink Recipe | Ingredients & How to Make It

Looking for a fun, colorful cocktail that tastes as good as it looks? Meet the Liquid Marijuana drink—a vibrant green cocktail that’s a hit at parties  food and social gatherings. Despite the name, this drink doesn’t actually contain marijuana. Instead, it gets its catchy title from its bright green hue, tropical flavors, and laid-back vibe.

This blog will guide you through everything you need to know about the Liquid Marijuana cocktail. From its ingredients and step-by-step instructions to tips for making it perfect, you’re about to become the go-to mixologist in your circle.

What Is a Liquid Marijuana Cocktail?

The Liquid Marijuana drink is a tropical cocktail made with a unique mix of spiced rum, coconut rum, melon liqueur, pineapple juice, and blue curaçao. Its name is inspired by the drink’s signature green color, created by the combination of blue curaçao and melon liqueur. It’s fruity, smooth, and slightly sweet—the perfect concoction for anyone who loves tropical cocktails.

Whether you’re sipping it poolside or serving it at a gathering, the Liquid Marijuana drink promises a bold flavor with just the right amount of kick.

Why You’ll Love Making Liquid Marijuana Cocktails

Wondering why this cocktail is worth mixing up? Here are some reasons it’s become a fan-favorite drink among cocktail enthusiasts:

  • Unique flavor profile. The combination of melon liqueur, coconut rum, and pineapple juice creates a tropical escape with every sip.
  • Visually appealing. Its vibrant green color ensures it’ll be the talk of the evening. Bonus points if you serve it in a clear glass with garnishes.
  • Easy to make. Despite its layered flavor, this drink is surprisingly simple to prepare with common bar ingredients.
  • Perfect for parties. The Liquid Marijuana cocktail is great for impressing guests, creating a tropical vibe, and kickstarting the fun.

Ingredients for a Liquid Marijuana Drink

Before you start mixing, gather the following ingredients:

  • 0.5 oz Spiced Rum (like Captain Morgan): Adds warmth and depth to the cocktail.
  • 0.5 oz Coconut Rum (like Malibu): Infuses a sweet, tropical flavor to complement the fruity undertones.
  • 0.5 oz Melon Liqueur (like Midori): Provides the signature green color and a touch of sweetness.
  • 0.5 oz Blue Curaçao: Offers citrusy notes while enhancing the drink’s vibrant color.
  • 1 oz Pineapple Juice: Balances the alcohol with a fruity sweetness and a hint of tang.
  • 1 oz Sweet & Sour Mix: Adds a slight tartness and brightness to the drink.
  • Ice: Chills the drink for maximum refreshment.
  • Optional Garnishes (e.g., lime wedge or cherry): Give your cocktail a professional touch.

Equipment Needed

To mix the perfect Liquid Marijuana drink, make sure you have the following tools ready:

  • A cocktail shaker for combining the ingredients.
  • A jigger or shot glass for measuring.
  • A strainer (if your shaker doesn’t have one).
  • A highball or rocks glass to serve your cocktail.

How to Make a Liquid Marijuana Drink

Mixing this cocktail is as easy as it gets! The steps below will walk you through crafting the Liquid Marijuana drink like a pro:

Step 1: Add Ingredients to Your Shaker

Fill a cocktail shaker halfway with ice. Pour in 0.5 oz of spiced rum, 0.5 oz of coconut rum, 0.5 oz of melon liqueur, 0.5 oz of blue curaçao, 1 oz of pineapple juice, and 1 oz of sweet & sour mix.

Step 2: Shake It Up

Cover your shaker and shake vigorously for about 10–15 seconds. You want to chill the drink and fully mix the ingredients to blend the flavors.

Step 3: Strain and Serve

Use a strainer to pour the mixture into your preferred glass. If you’re using a highball glass, fill it with fresh ice before straining. The vibrant green color should be irresistible!

Step 4 (Optional): Garnish Your Drink

Add a lime wedge, cherry, or even a small umbrella to elevate the presentation. A garnish isn’t necessary, but it certainly adds flair.

Step 5: Enjoy Responsibly

It’s time to sip and relax!

Pro Tips for Perfecting the Liquid Marijuana Drink

  • Chill Your Ingredients: Keep your juices and rums in the fridge before making the drink, ensuring a refreshingly cold cocktail.
  • Experiment with Garnishes: Play with different garnishes, like mint leaves or pineapple chunks, to suit your style.
  • Adjust the Sweetness: Not a fan of sweeter drinks? Reduce the sweet & sour mix slightly or balance it with more pineapple juice.
  • Batch for a Group: Hosting a party? Multiply the ingredient quantities and mix the drink in a pitcher. Just stir rather than shake in this case.
  • Use Quality Ingredients: While any blue curaçao or melon liqueur will do, premium brands make a noticeable difference in flavor.

When to Serve a Liquid Marijuana Cocktail

This drink shines in casual or celebratory settings, including:

  • Summer pool parties. Nothing screams tropical fun like the vibrant green Liquid Marijuana cocktail!
  • Beach vacations. Pair the drink with sandy shores and ocean breezes for the ultimate experience.
  • Game nights. Add a splash of fun to your social gatherings with this unique concoction.
  • Festive occasions. Its vibrant look makes it perfect for events like St. Patrick’s Day or tropical-themed parties.

Elevate Your Mixology Game with Better Recipes

The Liquid Marijuana cocktail is fun, colorful, and endlessly satisfying. Its bold flavors and tropical vibes make it a great addition to any celebration—or even just to unwind after a long day.

Now it’s your turn to mix up a Liquid Marijuana drink. Follow the recipe, experiment with your personal flair, and wow your friends with your mixology skills.

Looking for more cocktail inspiration? Stay tuned to our blog for more recipes, tips, and insider secrets to perfect your craft. Cheers!

Continue Reading

FOOD AND DRINK

Baked Chicken leg Quarters

Published

on

By

Baked Chicken leg Quarters

Baked Chicken leg quarters are a go-to dinner option for many households. They’re inexpensive, incredibly flavorful, and—when prepared just right—yield moist, tender meat with crispy, golden skin. But getting that perfect texture and taste can feel like a daunting task.

If you’ve found yourself googling “How to bake chicken leg quarters perfectly,” or struggling between recipes that all seem too complicated, this guide is for you. Here, we’ll walk you through every step of preparing irresistible baked chicken leg quarters, highlight essential tips, and explore variations to suit different tastes.

Whether it’s your first try or you’re a seasoned home chef, by the end of this article, you’ll have all the tools you need to impress with this versatile dish.

Why Chicken Leg Quarters?

Chicken leg quarters are a combination of both the thigh and the drumstick, making them a hearty, satisfying option for dinner. But there are many other reasons to choose these cuts:

  • Affordable and Economical:

When compared to chicken breasts, leg quarters are notably less expensive. This makes them ideal for feeding a family or preparing multiple meals on a budget.

  • Rich, Flavorful Meat:

Thanks to the dark meat, they naturally have a richer, more robust taste. Additionally, the skin and fat content help retain moisture while baking.

  • Versatility:

Chicken leg quarters adapt beautifully to an array of marinades, spice rubs, and side dishes, making them suited to various cuisines.

Now that you know why these cuts deserve a permanent spot in your meal rotations, here’s how to prepare them.

Preparing Your Chicken Leg Quarters

Step 1: Choose Quality Ingredients

The base of any great dish is quality ingredients. Look for fresh (or properly thawed) chicken leg quarters. Opt for organic or free-range chicken if possible, as they tend to have a slightly better flavor and texture.

Step 2: Dry the Skin for Crispiness

One of the secrets to achieving perfectly crispy skin is to start with completely dry chicken. After rinsing the chicken leg quarters under cold water, pat them thoroughly dry using paper towels.

For an even crispier finish, you can leave the chicken uncovered in the refrigerator for 30 minutes or so beforehand. This air-drying step helps wick away moisture from the surface of the skin.

Step 3: Season Generously

Good seasoning is key to building flavor. Start with salt and pepper as your base. Afterward, consider any of these popular seasoning blends to customize your chicken:

  • Classic Garlic and Herb:

Combine garlic powder, onion powder, dried rosemary, thyme, and a touch of paprika for color.

  • Lemon Pepper:

Add freshly grated lemon zest to black pepper and salt for a citrusy twist.

  • Smoky Barbecue:

Use smoked paprika, chili powder, brown sugar, and a hint of cayenne for some heat.

Marinate your chicken leg quarters for at least 20–30 minutes for maximum flavor—though letting them sit overnight in the refrigerator yields the best results.

How to Bake Chicken Leg Quarters

Here’s the tried-and-true method for baking chicken leg quarters that strikes a balance between juicy meat and perfectly crispy skin.

Step 1: Preheat the Oven

Preheat your oven to 400°F (200°C). This temperature is ideal for achieving a balance between crisping the skin and cooking the meat thoroughly.

Step 2: Prep Your Baking Dish

Line a baking dish or sheet with parchment paper or foil (for easier cleanup). Place an oven-safe wire rack on top of your tray to elevate the chicken. This allows air to circulate around the chicken while baking, resulting in a crispier finish.

Step 3: Arrange and Brush with Oil

Place your seasoned chicken leg quarters skin-side up on the wire rack. Lightly brush or spray the chicken with olive oil to help the skin crisp up and lock in the seasoning during baking.

Step 4: Bake and Monitor

Bake your chicken for roughly 35–45 minutes. Use a meat thermometer to check that the internal temperature reaches a safe 165°F (74°C). For extra crispy skin, finish the chicken under the broiler for 2–3 minutes, keeping a close eye on it to prevent burning.

Tips and Tricks for Perfect Results

  • Don’t Overcrowd:

Ensure there’s enough space around each piece of chicken to allow for even heat circulation.

  • Use a Thermometer:

A meat thermometer is your best friend. It ensures you don’t undercook or overcook your chicken.

  • Rest the Chicken:

Allow the chicken to rest for at least 5–10 minutes after baking. This step helps redistribute the juices, keeping the meat moist.

Flavor Variations to Try

The beauty of baked chicken leg quarters lies in their ability to pair well with a range of flavors. Here are some ideas:

  • Asian-Inspired:

Marinate your chicken in soy sauce, ginger, garlic, and a drizzle of honey or sesame oil.

  • Mediterranean:

Use olive oil, oregano, lemon, and garlic for a bright, fresh flavor profile.

  • Spicy Cajun:

Coat your chicken in Cajun seasoning and add a dash of hot sauce for a fiery kick.

What to Serve with Baked Chicken Leg Quarters

No meal is complete without the perfect sides to complement your baked chicken. Some popular pairings include:

  • Mashed potatoes or roasted sweet potatoes
  • Steamed green beans or a crisp salad
  • Buttery dinner rolls or crusty artisan bread
  • Cornbread or polenta for a Southern flair

For an all-in-one meal, add chopped vegetables (like carrots, potatoes, or zucchini) to your baking tray and roast them alongside the chicken.

Why Baked Chicken Leg Quarters Should Be a Staple in Your Menu

Chicken leg quarters aren’t just easy to bake—they’re also incredibly versatile. From a cozy family meal to a sophisticated dinner with guests, these flavorful cuts fit a variety of occasions.

By mastering this simple dish, you open up endless opportunities to experiment with flavors, sides, and presentation while still enjoying a hearty, nutritious, cost-effective option.

If you’ve never tried baking chicken leg quarters this way, now’s the time to elevate your cooking game.

Continue Reading

Trending