Connect with us

FOOD AND DRINK

Delicious and Easy Honey Bun Cake

Published

on

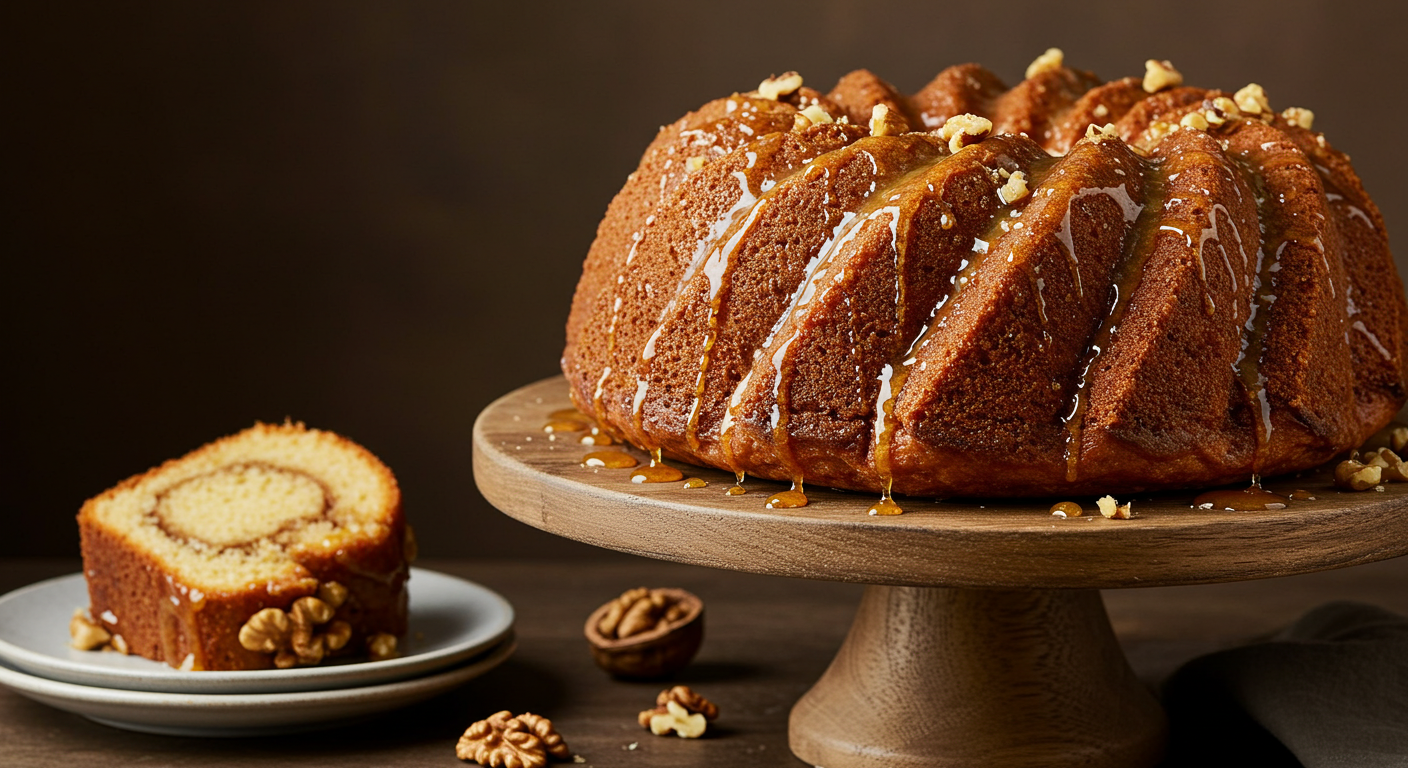
Looking to satisfy your sweet tooth with a delectable treat? Look no further than the irresistible honey bun cake. This mouthwatering dessert is a delightful combination of moist cake and gooey cinnamon swirls, topped off with a sweet glaze that will have you coming back for seconds.

I’ll share with you a tried and true honey bun cake recipe that is sure to impress your friends and family. Get ready to indulge in a slice of heaven as we guide you through the steps to create this heavenly dessert. So, grab your apron and let’s get baking.

What You’ll Love About This Recipe

When it comes to the honey bun cake recipe, there are several aspects that will make you fall in love with it. Let’s take a closer look at what makes this dessert a real winner:

1. The Perfect Balance of Flavors

The combination of sweet cake mix and tangy cream cheese creates a harmonious balance of flavors in every bite. The sweetness of the cake mix perfectly complements the tanginess of the cream cheese, resulting in an irresistible flavor palette. This delicate balance is one of the reasons why the honey bun cake stands out among other desserts.

2. A Joyful Baking Experience

Even though its intricate flavors, this recipe is surprisingly easy to make. You don’t need to be an experienced baker to whip up a delicious honey bun cake. The straightforward instructions and simple ingredients make it a joy to bake, even for beginners. So whether you’re a seasoned baker or just starting out, you’ll find this recipe enjoyable and rewarding.

3. Versatility for Any Occasion

Looking for a dessert that fits seamlessly into any menu or celebration? Look no further than the honey bun cake. Its versatility makes it ideal for any occasion, whether it’s a family gathering, a birthday party, or a casual get-together. The rich flavors and delightful textures of this cake can elevate any event and leave your guests wanting more.

4. A Delightful Sensory Experience

What sets the honey bun cake apart from other desserts is its amazing texture. The moist and rich cake, combined with the crunchy layer of brown sugar and cinnamon, promises a delightful sensory experience.

With every bite, you’ll enjoy the heavenly combination of soft, moist cake and gooey cinnamon swirls. It’s a delectable treat that will satisfy your taste buds and leave you craving for more.

To conclude, there are many reasons why you’ll love the honey bun cake recipe. Its perfect balance of flavors, ease of preparation, versatility for any occasion, and delightful sensory experience all contribute to making it a truly exceptional dessert.

Don’t wait any longer – grab your apron and get ready to indulge in a slice of heaven with this tried and true recipe.

Ingredients


To create a mouthwatering honey bun cake, you’ll need a few simple ingredients that are easily available at your local grocery store. Let’s take a look at what you’ll need:

For the Cake:

  • 8 ounces of cream cheese, softened
  • 4 large eggs
  • 2/3 cup of oil
  • 15.25 ounces of vanilla or yellow cake mix
  • 3/4 cup of packed brown sugar
  • 2 teaspoons of cinnamon

For the Glaze:

  • 2 1/2 cups of powdered sugar
  • 1/2 cup of heavy cream
  • 2 teaspoons of vanilla extract

These ingredients come together to create a perfect balance of flavors and textures that make the honey bun cake truly special. The cream cheese adds a tangy note to the sweet cake mix, while the brown sugar and cinnamon create a delightful layer of crunchiness on top.

The cream cheese, eggs, and oil provide moisture to the cake, ensuring a soft and moist texture. The vanilla or yellow cake mix serves as the base for the cake, providing a classic and versatile flavor that everyone will love.

Once the cake is baked to perfection, the glaze takes it to a whole new level. The combination of powdered sugar, heavy cream, and vanilla extract results in a rich and creamy glaze that adds a decadent touch to the cake. It perfectly complements the flavors of the cake while adding an extra layer of sweetness.

Now that you have all the ingredients for a homemade honey bun cake, it’s time to roll up your sleeves and get baking. Follow the simple instructions and prepare yourself for a delightful sensory experience that will leave you craving for more.

No need to worry about complex or hard-to-find ingredients. With just a few simple steps, you’ll be able to create a delicious honey bun cake that will impress your friends and family.

Instructions


To make a delicious honey bun cake, follow these simple steps:

  1. Preheat the oven to 350°F and grease a baking dish.
  2. In a mixer, beat the cream cheese until smooth. This will ensure a creamy texture in the cake. 3. Add the oil and eggs to the mixer and continue beating until the mixture is smooth. The oil will contribute to the moistness of the cake, while the eggs will help bind the ingredients together.
  3. Gradually add the cake mix to the mixer and mix until fully incorporated. The batter will be thick, but don’t worry, this will result in a rich and satisfying cake.
  4. In a small bowl, mix together the brown sugar and cinnamon. This combination will add a flavorful and crunchy layer to the top of the cake.
  5. Pour half of the cake batter into the prepared baking dish. 7. Sprinkle the brown sugar and cinnamon mixture evenly over the entire top of the batter.
  6. Add dollops of the remaining batter and smooth it out as much as possible. This will create a marbled effect, adding visual appeal to the cake.
  7. Bake the cake in the preheated oven for 35-40 minutes or until a toothpick inserted into the center comes out clean. This is an important step to ensure that the cake is fully baked and ready to be enjoyed.
  8. Allow the cake to cool to room temperature before moving on to the next step. This will ensure that the glaze sets properly.
  9. To make the glaze, simply pour all the glaze ingredients into a bowl and mix until well combined. The powdered sugar, heavy cream, and vanilla extract will create a rich and creamy glaze that perfectly complements the flavors of the cake.
  10. Pour the glaze evenly over the cooled cake, allowing it to set. This will add a final touch of sweetness and moisture to the cake.
  11. Finally, slice the cake, serve, and enjoy the delightful sensory experience of baking and indulging in a homemade honey bun cake.

Now that you know the step-by-step instructions, it’s time to gather the ingredients and start baking your own honey bun cake. Don’t forget to share this recipe with your friends and family—they’re sure to love it too.

Top Tips

When it comes to making a delicious honey bun cake, there are a few key tips that can greatly enhance your baking experience and ensure a perfect outcome. By following these tips, you’ll be able to create a cake that is moist, flavorful, and visually stunning. Here are some expert suggestions to help you along the way:

Soften the Cream Cheese

Before you begin, make sure your cream cheese is at room temperature. Softening the cream cheese allows for easy blending and ensures a smooth mixture. Cold or hard cream cheese can result in lumps in your cake batter, affecting the texture of the final product. So remember to take your cream cheese out of the refrigerator and let it sit for about 30 minutes before you start baking.

Don’t Overmix the Batter

Mixing your batter just until the ingredients are combined is crucial to achieve a light and tender cake. Overmixing the batter develops gluten in the flour, which can lead to a denser texture in the finished cake. To avoid a heavy cake, stop mixing as soon as the batter is smooth and well incorporated. This will result in a light and fluffy honey bun cake that is sure to impress.

Spread the Cinnamon-Sugar Evenly

To fully enjoy the spiced sweetness of the cinnamon-sugar mixture in every bite, it’s important to distribute it evenly over the batter. One helpful tip is to sprinkle the cinnamon-sugar mixture from a height. This will allow the mixture to disperse more evenly over the batter, ensuring that each slice of cake is filled with the perfect amount of warmth and flavor.

Cool Completely Before Glazing

Patience is key when it comes to cooling your honey bun cake before adding the glaze. To achieve that glossy, appetizing top, let your cake cool to room temperature before pouring the glaze over it. If the cake is still warm, the glaze will melt and soak in, resulting in a soggy rather than a glossy finish. So, resist the temptation to rush and allow your cake to cool completely for the best results.

Substitutions

When it comes to baking, it’s always good to know that you have options. Whether you have dietary restrictions or simply want to add a unique twist to your honey bun cake, here are some substitutions you can try:

1. Vanilla Cake Mix

While a traditional honey bun cake uses a vanilla cake mix, you can experiment with different flavors to customize your cake. For an extra warming flavor, try replacing the vanilla cake mix with a spice cake mix. This will add a delightful hint of cinnamon, nutmeg, and other warm spices to your cake, giving it a cozy and comforting taste.

2. Cream Cheese

If you’re lactose intolerant or prefer a dairy-free option, there are alternatives you can use in place of regular cream cheese. Opt for lactose-free cream cheese, which is available in most grocery stores, or try a non-dairy cream cheese alternative made from plants, such as almond or soy. These alternatives still provide a creamy texture and a tangy flavor that complements the sweetness of the cake.

3. Glaze

The glaze is an essential part of the honey bun cake, adding a sweet and glossy finish. If you need to avoid lactose, you can use a lactose-free milk alternative, such as almond milk or coconut milk, in place of regular milk in the glaze. This will give you the same creamy and smooth consistency without compromising on taste.

By making these substitutions, you can create a honey bun cake that suits your dietary needs and preferences, all while adding an extra touch of flavor. Whether you’re looking to make it dairy-free or add a unique twist, these substitutions will ensure that your cake is still delicious and enjoyable.

Next, we’ll move on to some additional tips to help you make the perfect honey bun cake.

Variations

Now that you have learned how to make a delicious honey bun cake, it’s time to get creative and try some variations. There are endless possibilities to make this cake your own and cater to your personal preferences or dietary restrictions.

You can experiment with different flavors of cake mix to add a unique twist to your honey bun cake. Whether it’s chocolate, vanilla, or even lemon, the choice is yours. Also, if you have dietary restrictions or are lactose intolerant, you can use lactose-free cream cheese or a lactose-free milk alternative in the glaze.

Don’t be afraid to get adventurous and add your favorite ingredients to the batter. Consider incorporating nuts, raisins, or even shredded coconut to give your cake an extra texture and flavor boost.

Remember, the key to a perfect honey bun cake is to follow the basic recipe and make it your own. Share this delightful recipe with your loved ones and enjoy the sweet and indulgent treat together. Happy baking.

Continue Reading
Click to comment

Leave a Reply

Your email address will not be published. Required fields are marked *

FOOD AND DRINK

Special K Bars | Nutrition, Benefits & Flavors

Published

on

By

Special K Bars | Nutrition, Benefits & Flavors

If you’ve wandered down the snack aisle recently, you’ve likely come across the iconic red “K” on the box of Special K Bars. Whether you’re looking for an on-the-go breakfast, a mid-day snack to boost your energy, or a post-workout treat, Special K Bars have become a popular option for health-conscious individuals.

But what exactly makes these bars stand out? Are they truly healthy, and what flavors can you choose from? This blog takes a deep look at Special K Bars, examining their nutrition, benefits, and the many delicious options offered.

What Are Special K Bars?

Special K Bars are pre-packaged snack bars made by Kellogg’s, designed to fit into a healthy and active lifestyle. Often found alongside other granola or protein bars, these light yet satisfying snacks are part of the Special K product line, known for promoting weight management and balanced nutrition.

Unlike heavier protein bars or indulgent granola bars, Special K Bars are marketed as a thoughtful balance between flavor and functionality—providing you with convenient energy without sacrificing taste.

Designed for Busy Lifestyles

Special K Bars are about convenience without compromise. For those juggling a tight schedule, they offer a quick bite that’s portion-controlled and aligned with healthier nutritional standards.

The Nutrition of Special K Bars

Are Special K Bars as healthy as they claim to be? Here’s a closer look at what’s inside these bars.

Calories and Macronutrient Breakdown

Each Special K Bar generally contains between 90 and 120 calories, depending on the flavor variety. This makes them a low-calorie option compared to other snack bars.

  • Protein: While some bars contain as little as 2g of protein, varieties like the ‘Protein Meal Bars’ pack around 10-12g of protein.
  • Fiber: Many Special K Bars contain 2-4g of fiber, supporting digestive health and helping you feel full longer.
  • Carbohydrates: With around 15-20g of carbs per bar, they provide quick, accessible energy for your day.
  • Sugar: Special K Bars typically have between 6-12g of sugar, depending on the flavor (with some options offering lower-sugar alternatives).

Key Ingredients

Special K Bars combine essential grains like rice, oats, and wheat, blended with flavors like fruits, chocolate, and nuts to create a variety of delicious options. Many include added vitamins and minerals, such as B vitamins or iron, meant to support energy metabolism or overall health.

However, be mindful—the addition of sweet syrups or artificial flavors can make some bars less ideal if you’re avoiding processed added sugars.

Benefits of Special K Bars

What sets Special K Bars apart from other snacks filling the shelves? Below are the standout benefits.

1. Portioned and Balanced for Weight Management

Portion control is essential when managing calories, and Special K Bars deliver just that—a satisfying snack that doesn’t go overboard on calories or sugar. Most bars are designed to help you enjoy something sweet or savory while still staying on track with your healthy eating goals.

2. Convenient and Portable

Whether you’re running to your next meeting or carpooling with kids, Special K Bars are compact and portable, making them easy to throw into any bag or lunchbox.

3. Supports Energy Levels

With a solid mix of carbs for quick energy, some protein, and occasionally added vitamins like B12 or iron, Special can help fuel your day and keep you going between meals.

4. Variety of Flavors to Suit All Tastes

From classic fruit-inspired flavors to indulgent chocolate-coated varieties, there’s something for everyone.

5. Affordable and Easily Available

Unlike some boutique snack bars, Special are reasonably priced and widely available in grocery stores, drugstores, and online retailers.

Explore the Delicious Flavors

Special K Bars come in a multitude of flavors, offering something to satisfy nearly any craving. Here are some of the most popular options broken into categories.

Fruity Flavors

  • Strawberry

Packed with dried fruit pieces for a vibrant burst of flavor.

  • Blueberry Bliss

A wholesome mix of blueberries and subtle sweetness.

Indulgent Flavors

  • Chocolatey Pretzel

Perfect for those who want the yum factor of chocolate with a crunchy twist.

  • Peanut Butter Chocolate

A smooth and nutty flavor for peanut butter lovers.

Protein-Packed Options

  • Caramel Peanut Protein Bar

Provides a slightly indulgent yet protein-rich fuel for your workouts.

  • Cookies and Crème Protein Bar

Offers a sweet dessert-inspired flavor with added protein.

Low-Sugar Alternatives

  • Cranberry Walnut

A nutty and tart option, with less sugar but plenty of taste.

  • Dark Chocolate Cherry

Provides a lower-sugar alternative without compromising on deliciousness.

How to Incorporate Special into Your Day

Still wondering how these bars can fit into your routine? Try these simple ideas.

  1. On-the-Go Breakfast

Pair a Special K Protein Bar with a cup of coffee or a piece of fruit for a quick breakfast that fuels your morning.

  1. Post-Workout Snack

Reach for a protein-rich flavor to help aid recovery after your workout.

  1. Office Stash

Keep a few bars in your desk drawer for late afternoon energy slumps.

  1. Travel Companion

Throw one in your purse or carry-on for a convenient snack on the road or when you’re flying.

Should You Try Special K Bars?

Ultimately, Special are a versatile snack option ideal for busy individuals looking to supplement their diet with something convenient and relatively healthy. While they may not replace a well-balanced meal, they provide a good alternative to fast food or heavily processed snacks.

For those chasing a fitness goal, craving something sweet without the guilt, or simply looking for a reliable snack for the day to day, Special  offer a dependable solution.

Continue Reading

FOOD AND DRINK

Liquid Marijuana Drink Recipe | Ingredients & How to Make It

Published

on

By

Liquid Marijuana Drink Recipe | Ingredients & How to Make It

Looking for a fun, colorful cocktail that tastes as good as it looks? Meet the Liquid Marijuana drink—a vibrant green cocktail that’s a hit at parties  food and social gatherings. Despite the name, this drink doesn’t actually contain marijuana. Instead, it gets its catchy title from its bright green hue, tropical flavors, and laid-back vibe.

This blog will guide you through everything you need to know about the Liquid Marijuana cocktail. From its ingredients and step-by-step instructions to tips for making it perfect, you’re about to become the go-to mixologist in your circle.

What Is a Liquid Marijuana Cocktail?

The Liquid Marijuana drink is a tropical cocktail made with a unique mix of spiced rum, coconut rum, melon liqueur, pineapple juice, and blue curaçao. Its name is inspired by the drink’s signature green color, created by the combination of blue curaçao and melon liqueur. It’s fruity, smooth, and slightly sweet—the perfect concoction for anyone who loves tropical cocktails.

Whether you’re sipping it poolside or serving it at a gathering, the Liquid Marijuana drink promises a bold flavor with just the right amount of kick.

Why You’ll Love Making Liquid Marijuana Cocktails

Wondering why this cocktail is worth mixing up? Here are some reasons it’s become a fan-favorite drink among cocktail enthusiasts:

  • Unique flavor profile. The combination of melon liqueur, coconut rum, and pineapple juice creates a tropical escape with every sip.
  • Visually appealing. Its vibrant green color ensures it’ll be the talk of the evening. Bonus points if you serve it in a clear glass with garnishes.
  • Easy to make. Despite its layered flavor, this drink is surprisingly simple to prepare with common bar ingredients.
  • Perfect for parties. The Liquid Marijuana cocktail is great for impressing guests, creating a tropical vibe, and kickstarting the fun.

Ingredients for a Liquid Marijuana Drink

Before you start mixing, gather the following ingredients:

  • 0.5 oz Spiced Rum (like Captain Morgan): Adds warmth and depth to the cocktail.
  • 0.5 oz Coconut Rum (like Malibu): Infuses a sweet, tropical flavor to complement the fruity undertones.
  • 0.5 oz Melon Liqueur (like Midori): Provides the signature green color and a touch of sweetness.
  • 0.5 oz Blue Curaçao: Offers citrusy notes while enhancing the drink’s vibrant color.
  • 1 oz Pineapple Juice: Balances the alcohol with a fruity sweetness and a hint of tang.
  • 1 oz Sweet & Sour Mix: Adds a slight tartness and brightness to the drink.
  • Ice: Chills the drink for maximum refreshment.
  • Optional Garnishes (e.g., lime wedge or cherry): Give your cocktail a professional touch.

Equipment Needed

To mix the perfect Liquid Marijuana drink, make sure you have the following tools ready:

  • A cocktail shaker for combining the ingredients.
  • A jigger or shot glass for measuring.
  • A strainer (if your shaker doesn’t have one).
  • A highball or rocks glass to serve your cocktail.

How to Make a Liquid Marijuana Drink

Mixing this cocktail is as easy as it gets! The steps below will walk you through crafting the Liquid Marijuana drink like a pro:

Step 1: Add Ingredients to Your Shaker

Fill a cocktail shaker halfway with ice. Pour in 0.5 oz of spiced rum, 0.5 oz of coconut rum, 0.5 oz of melon liqueur, 0.5 oz of blue curaçao, 1 oz of pineapple juice, and 1 oz of sweet & sour mix.

Step 2: Shake It Up

Cover your shaker and shake vigorously for about 10–15 seconds. You want to chill the drink and fully mix the ingredients to blend the flavors.

Step 3: Strain and Serve

Use a strainer to pour the mixture into your preferred glass. If you’re using a highball glass, fill it with fresh ice before straining. The vibrant green color should be irresistible!

Step 4 (Optional): Garnish Your Drink

Add a lime wedge, cherry, or even a small umbrella to elevate the presentation. A garnish isn’t necessary, but it certainly adds flair.

Step 5: Enjoy Responsibly

It’s time to sip and relax!

Pro Tips for Perfecting the Liquid Marijuana Drink

  • Chill Your Ingredients: Keep your juices and rums in the fridge before making the drink, ensuring a refreshingly cold cocktail.
  • Experiment with Garnishes: Play with different garnishes, like mint leaves or pineapple chunks, to suit your style.
  • Adjust the Sweetness: Not a fan of sweeter drinks? Reduce the sweet & sour mix slightly or balance it with more pineapple juice.
  • Batch for a Group: Hosting a party? Multiply the ingredient quantities and mix the drink in a pitcher. Just stir rather than shake in this case.
  • Use Quality Ingredients: While any blue curaçao or melon liqueur will do, premium brands make a noticeable difference in flavor.

When to Serve a Liquid Marijuana Cocktail

This drink shines in casual or celebratory settings, including:

  • Summer pool parties. Nothing screams tropical fun like the vibrant green Liquid Marijuana cocktail!
  • Beach vacations. Pair the drink with sandy shores and ocean breezes for the ultimate experience.
  • Game nights. Add a splash of fun to your social gatherings with this unique concoction.
  • Festive occasions. Its vibrant look makes it perfect for events like St. Patrick’s Day or tropical-themed parties.

Elevate Your Mixology Game with Better Recipes

The Liquid Marijuana cocktail is fun, colorful, and endlessly satisfying. Its bold flavors and tropical vibes make it a great addition to any celebration—or even just to unwind after a long day.

Now it’s your turn to mix up a Liquid Marijuana drink. Follow the recipe, experiment with your personal flair, and wow your friends with your mixology skills.

Looking for more cocktail inspiration? Stay tuned to our blog for more recipes, tips, and insider secrets to perfect your craft. Cheers!

Continue Reading

FOOD AND DRINK

Baked Chicken leg Quarters

Published

on

By

Baked Chicken leg Quarters

Baked Chicken leg quarters are a go-to dinner option for many households. They’re inexpensive, incredibly flavorful, and—when prepared just right—yield moist, tender meat with crispy, golden skin. But getting that perfect texture and taste can feel like a daunting task.

If you’ve found yourself googling “How to bake chicken leg quarters perfectly,” or struggling between recipes that all seem too complicated, this guide is for you. Here, we’ll walk you through every step of preparing irresistible baked chicken leg quarters, highlight essential tips, and explore variations to suit different tastes.

Whether it’s your first try or you’re a seasoned home chef, by the end of this article, you’ll have all the tools you need to impress with this versatile dish.

Why Chicken Leg Quarters?

Chicken leg quarters are a combination of both the thigh and the drumstick, making them a hearty, satisfying option for dinner. But there are many other reasons to choose these cuts:

  • Affordable and Economical:

When compared to chicken breasts, leg quarters are notably less expensive. This makes them ideal for feeding a family or preparing multiple meals on a budget.

  • Rich, Flavorful Meat:

Thanks to the dark meat, they naturally have a richer, more robust taste. Additionally, the skin and fat content help retain moisture while baking.

  • Versatility:

Chicken leg quarters adapt beautifully to an array of marinades, spice rubs, and side dishes, making them suited to various cuisines.

Now that you know why these cuts deserve a permanent spot in your meal rotations, here’s how to prepare them.

Preparing Your Chicken Leg Quarters

Step 1: Choose Quality Ingredients

The base of any great dish is quality ingredients. Look for fresh (or properly thawed) chicken leg quarters. Opt for organic or free-range chicken if possible, as they tend to have a slightly better flavor and texture.

Step 2: Dry the Skin for Crispiness

One of the secrets to achieving perfectly crispy skin is to start with completely dry chicken. After rinsing the chicken leg quarters under cold water, pat them thoroughly dry using paper towels.

For an even crispier finish, you can leave the chicken uncovered in the refrigerator for 30 minutes or so beforehand. This air-drying step helps wick away moisture from the surface of the skin.

Step 3: Season Generously

Good seasoning is key to building flavor. Start with salt and pepper as your base. Afterward, consider any of these popular seasoning blends to customize your chicken:

  • Classic Garlic and Herb:

Combine garlic powder, onion powder, dried rosemary, thyme, and a touch of paprika for color.

  • Lemon Pepper:

Add freshly grated lemon zest to black pepper and salt for a citrusy twist.

  • Smoky Barbecue:

Use smoked paprika, chili powder, brown sugar, and a hint of cayenne for some heat.

Marinate your chicken leg quarters for at least 20–30 minutes for maximum flavor—though letting them sit overnight in the refrigerator yields the best results.

How to Bake Chicken Leg Quarters

Here’s the tried-and-true method for baking chicken leg quarters that strikes a balance between juicy meat and perfectly crispy skin.

Step 1: Preheat the Oven

Preheat your oven to 400°F (200°C). This temperature is ideal for achieving a balance between crisping the skin and cooking the meat thoroughly.

Step 2: Prep Your Baking Dish

Line a baking dish or sheet with parchment paper or foil (for easier cleanup). Place an oven-safe wire rack on top of your tray to elevate the chicken. This allows air to circulate around the chicken while baking, resulting in a crispier finish.

Step 3: Arrange and Brush with Oil

Place your seasoned chicken leg quarters skin-side up on the wire rack. Lightly brush or spray the chicken with olive oil to help the skin crisp up and lock in the seasoning during baking.

Step 4: Bake and Monitor

Bake your chicken for roughly 35–45 minutes. Use a meat thermometer to check that the internal temperature reaches a safe 165°F (74°C). For extra crispy skin, finish the chicken under the broiler for 2–3 minutes, keeping a close eye on it to prevent burning.

Tips and Tricks for Perfect Results

  • Don’t Overcrowd:

Ensure there’s enough space around each piece of chicken to allow for even heat circulation.

  • Use a Thermometer:

A meat thermometer is your best friend. It ensures you don’t undercook or overcook your chicken.

  • Rest the Chicken:

Allow the chicken to rest for at least 5–10 minutes after baking. This step helps redistribute the juices, keeping the meat moist.

Flavor Variations to Try

The beauty of baked chicken leg quarters lies in their ability to pair well with a range of flavors. Here are some ideas:

  • Asian-Inspired:

Marinate your chicken in soy sauce, ginger, garlic, and a drizzle of honey or sesame oil.

  • Mediterranean:

Use olive oil, oregano, lemon, and garlic for a bright, fresh flavor profile.

  • Spicy Cajun:

Coat your chicken in Cajun seasoning and add a dash of hot sauce for a fiery kick.

What to Serve with Baked Chicken Leg Quarters

No meal is complete without the perfect sides to complement your baked chicken. Some popular pairings include:

  • Mashed potatoes or roasted sweet potatoes
  • Steamed green beans or a crisp salad
  • Buttery dinner rolls or crusty artisan bread
  • Cornbread or polenta for a Southern flair

For an all-in-one meal, add chopped vegetables (like carrots, potatoes, or zucchini) to your baking tray and roast them alongside the chicken.

Why Baked Chicken Leg Quarters Should Be a Staple in Your Menu

Chicken leg quarters aren’t just easy to bake—they’re also incredibly versatile. From a cozy family meal to a sophisticated dinner with guests, these flavorful cuts fit a variety of occasions.

By mastering this simple dish, you open up endless opportunities to experiment with flavors, sides, and presentation while still enjoying a hearty, nutritious, cost-effective option.

If you’ve never tried baking chicken leg quarters this way, now’s the time to elevate your cooking game.

Continue Reading

Trending